

Solar Power, Beautifully Integrated
Traditional bolt-on solar panels have always had one problem: they look like an afterthought. Viridian Solar, a British manufacturer based near Cambridge (now part of the Marshalls Group), set out to fix that — and Clearline Fusion is the result.
Instead of sitting on brackets above your roof, Clearline Fusion panels replace your tiles or slates entirely. They slot directly into the roofline, sit completely flush, and are sealed watertight with precision-engineered metal flashings. The result is a roof that generates clean energy and looks better than before — with no rails, no clamps, and no shadows.
Clearline Fusion is the only roof-integrated solar system with independent BBA (British Board of Agrément) certification for durability, and the only one confirmed to meet 2024 NHBC Technical Requirements. Whether you're retrofitting an existing home or specifying for new build, it's the system professional installers keep coming back to.
"After a thorough assessment of all the options, we decided that the Clearline Fusion system offered us the best combination of quality, value and excellent aesthetics. The ease of installation, the design, and the aesthetics are unmatched."
— Professional installer, via Viridian SolarHow the Clearline Fusion System Works
Clearline Fusion is a complete ecosystem — panels, flashings, inverter, and smart monitoring all designed to work together. Here's what makes up the full system:
The Four Pillars of the Clearline Fusion System
🔲 PV16 Panels
Full black monocrystalline modules available in 335W, 405W, and 445W. Portrait or landscape mounting. Industry-leading panel density for tight roof spaces.
🏗️ Roofing Kits & Flashings
Push-fit aluminium flashings create a weathertight seal without additional lead or support timber. Five kit types cover any rectangular array shape, plus corner kits for L-shaped roofs.
⚡ Clearline Inverter
Single-phase, 1–6kW with 1 or 2 MPPT inputs. Integrated DC isolation, G98/G99 ready, WiFi monitoring via the WE Mate app. Designed to complement Fusion panels perfectly.
🔒 ArcBox Safety Enclosures
KIWA fire-tested solar connector enclosures that contain DC arc faults safely within the roof. Built-in ventilation and drainage prevent moisture build-up.
📶 WiFi Module & CT Clamp
Add real-time monitoring via the Solar Portal app, and optionally a CT clamp for export-limiting and DNO compliance under G98/G99 regulations.
🔧 Mounting Brackets
A full suite of ArcBox mounting brackets for tile battens, pitched rail systems, flat roof rail systems, Esdec FlatFix, and Renusol FS10 — all engineered for long-term UK weather exposure.
The PV16 Panel Range
Viridian's PV16 modules are designed exclusively for in-roof installation. Every panel uses full-black monocrystalline silicon — black frame, black backsheet, black cells — for a clean, uniform appearance with no visible metalwork. They can be installed with the junction box at the top or bottom, giving installers maximum flexibility with cable routing.

Clearline PV16-335-G1 335W Full Black
BBA Certified BIPV. Ideal entry-level panel for standard residential arrays.

Clearline PV16-405-M10 405W Full Black
M10 format for higher power density. Great balance of output and cost.

Clearline PV16 M10 445W Dual Glass All Black
Flagship panel. Highest wattage, dual glass construction for maximum durability and output.
Panel Specification Comparison
| Specification | PV16-335-G1 | PV16-405-M10 | PV16-445-M10 |
|---|---|---|---|
| Peak Power (Wp) | 335W | 405W | 445W |
| Cell Technology | Mono PERC | Mono PERC M10 | Mono M10 Dual Glass |
| Frame Colour | Full Black | Full Black | Full Black |
| Certification | BBA Certified | IEC 61215 | IEC 61215 |
| Orientation | Portrait & Landscape | Portrait & Landscape | Portrait & Landscape |
| Junction Box Position | Top or Bottom | Top or Bottom | Top or Bottom |
| Roof Pitch Range | 20° – 60° | 20° – 60° | 20° – 60° |
| Price (inc. VAT) | £260.00 | £285.00 | £290.00 |
Watch the Official Installation Tutorial
Viridian Solar's official step-by-step installation video walks through the full Clearline Fusion fitting process — from setting out the roof to clipping in the final panel and connecting the flashings.
▶ Official Viridian Solar — Clearline Fusion Installation Tutorial (12 min)
How to Fit Clearline Fusion: Step-by-Step
Clearline Fusion is designed to be installed by a competent roofer working alongside a qualified electrician. The push-fit connection system means experienced teams regularly achieve under 45 minutes per kWp. Here's how a typical installation works:
-
1
Design & Layout Planning
Use the free Fusion Configurator (fusionconfigurator.com) to plan your array, select the correct flashing kits, and generate a priced parts list. Five kit types (Left, Right, Centre, Y-row extender, J-top) cover any rectangular combination of columns and rows. Corner Conversion Kits (CLT, CRT, CRB, CLB) handle L-shaped or stepped arrays.
-
2
Prepare the Roof Deck
Clearline Fusion requires a continuous, functional roofing membrane (underfelt) that terminates in a gutter. No additional battens, support timbers, or lead flashing are needed — the system's flashings are self-contained. Lay tiles or slate around the array position, leaving the panel zone clear.
-
3
Set Out the Lower Edge
Push the sill flashing into the gasket at the bottom of the lowest panel row. For interlocking tiles, the lower gap 'X' is typically 130–150mm. Reduce this slightly for thinner tiles. Align to existing tile or slate courses for a professional finish. Slate roofs: align the bottom panel edge with the slate edge for best results.
-
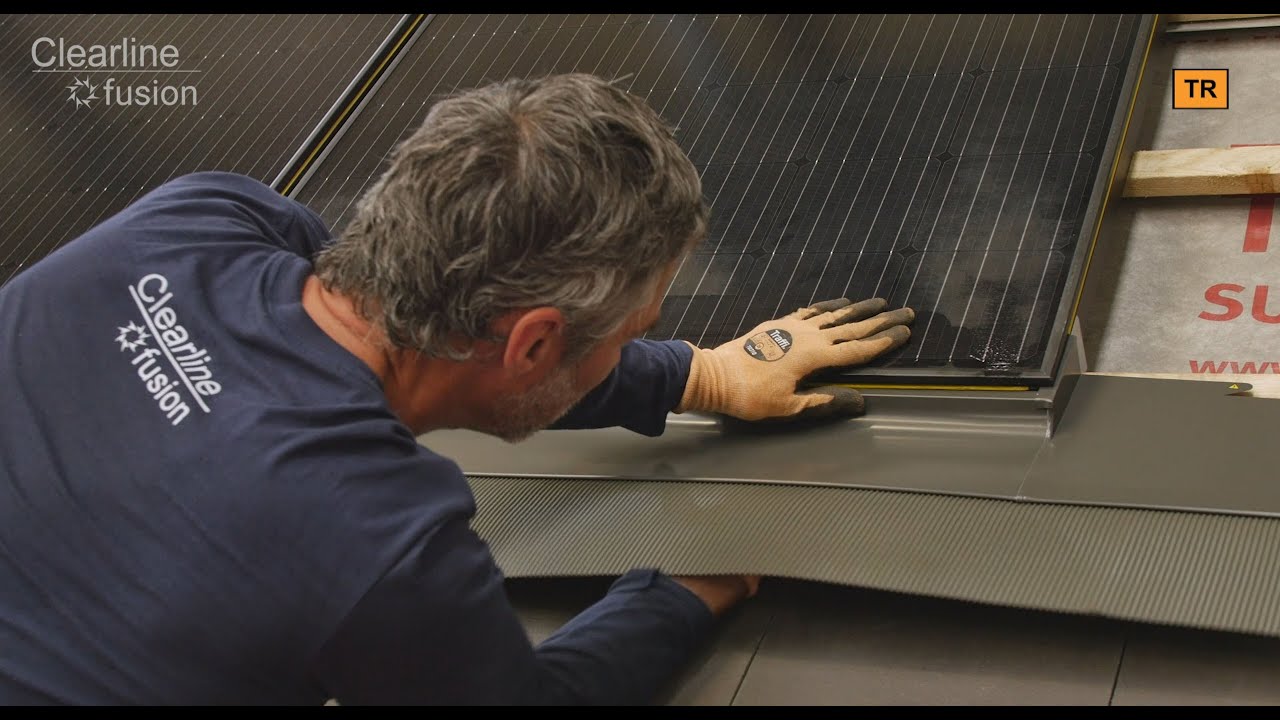
4
Install Panels Column by Column
Start at the bottom-left and work column by column, moving right. Fix each panel to the rafters using rafter brackets (two 50mm screws per rafter crossing) and to tile battens with batten brackets. Push the joining strip into the gasket on the top face of the lower panel, then slide the upper panel down to engage simultaneously with the combi-bracket and joining strip.
-
5
Fit Gutters and Side Flashings
Slide the lower gutter between adjacent column panels. Fit the upper gutter between panels and nail the gutter fixing strip to a batten. Push the upper side flashing into the panel gasket, fix the outside edge with side fixing tabs, and fold the protruding end of the joining strip down over the side flashing (never upwards). Lubricate gaskets with glass cleaner if needed.
-
6
Electrical Testing & Cable Routing
Electrically test each panel as it is installed. Cables can be passed through roofing membrane laps for connection inside the building (recommended), or connected to adjacent panels in the batten space. Connect in rows or columns based on shading analysis and potential difference. Panels accept MC4 connectors (Stäubli). Install ArcBox enclosures at each connector location.
-
7
Mount & Commission the Inverter
Wall-mount the Clearline inverter in a sheltered location, avoiding direct sun or rain. Connect DC strings from the roof, then AC output to the consumer unit. Fit the CT clamp to the main supply cable for export limiting. Add the WiFi module and register on the Solar Portal / WE Mate app. Commission per G98 or G99 notification requirements.
-
8
Final Checks & Handover
Verify all flashing edges are straight and gaskets fully seated. Check for any debris in the gutter channels. Complete the commissioning checklist, hand over system documentation to the homeowner, and register the installation for the 15-year system warranty. Annual maintenance checks are recommended.
💡 Pro Installer Tip
Clearline Fusion flashings may have sharp edges — always wear gloves. For best results, ensure flashing edges are straight before pushing gaskets home. The system is designed for 20°–60° roof pitches. For roof pitches below 20° or sarking board roofs without battens (common in Scotland), use the Sarking Bracket Kit SB16 range.
Compatible with All Common UK Roof Types
One of the biggest advantages of Clearline Fusion is its universal compatibility. The same flashing system works on virtually every common UK roof — no proprietary adapters, no special connectors for each tile manufacturer.
Interlocking Concrete & Clay Tiles
The most common UK roof type. Set the lower gap 'X' to 130–150mm (reduce for thinner tiles). Batten brackets fix panels to existing tile battens. No additional batten required.
Standard KitNatural & Fibre Cement Slate
Align the bottom panel edge with the slate course below for best aesthetics. Slates beneath panels may need nailing before panel installation. The slate-specific fixing instructions are included with every kit.
Standard KitScottish Sarking Roofs
Common in Scotland where tiles or slates are fixed directly to sarking board without tile battens. Use the Sarking Bracket Kit (SB16 range) which provides fixing to the sarking board rather than battens.
SB16 Kit RequiredHipped Roofs
Corner Conversion Kits (CLT, CRT, CRB, CLB) allow L-shaped and stepped arrays that follow the hip line. Panels can be installed in any non-rectangular configuration to maximise use of available roof area.
Corner Kit RequiredRoofs with Velux Windows
Integration kits for VELUX ODL roof windows allow a roof window to sit within the solar array — an elegant solution for loft conversions where both light and solar are required.
VELUX ODL KitNew Build & Retrofit
Equally suited to new build (where panels are specified from the start as part of the roof) or retrofit (where the roof is opened up and panels replace existing tiles). Meets 2024 NHBC Technical Requirements and Part L compliance.
BBA Certified⚠️ Roof Pitch Requirement
Clearline Fusion is designed for roof pitches between 20° and 60°. Below 10° the self-cleaning rainfall effect is reduced and more frequent cleaning may be needed. Contact us for advice on unusual roof configurations.
Clearline Fusion vs Traditional On-Roof Solar
The debate between in-roof and on-roof solar is often misunderstood. Here's an honest, side-by-side comparison:
| Feature | Clearline Fusion (In-Roof) | Traditional On-Roof |
|---|---|---|
| Aesthetics | ✓ Flush, integrated, no visible rails | ✗ Raised panels, visible clamps & rails |
| Wind Resistance | ✓ 2× higher certified resistance | ✗ Lower resistance in edge zones |
| Roof Maintenance | ✓ No roof access obstruction | ✗ Panels must be removed for tile repairs |
| Lead Flashing Needed | ✓ No — fully integrated flashings | ✗ Often required at edges |
| Certification | ✓ BBA + NHBC 2024 certified | Varies by product |
| New Build Suitability | ✓ Ideal — tiles replaced with panels | Suitable but less elegant |
| Retrofit Suitability | ✓ Fully supported | ✓ Easier on existing roof |
| Operating Temperature | Slightly warmer in summer | ✓ More airflow underneath |
| Part L Compliance | ✓ Meets Future Homes Standard | Varies |
The Viridian Clearline Inverter
Designed specifically to complement Clearline Fusion panels, the Viridian Clearline inverter range covers single-phase systems from 1.0kW up to 6.0kW — enough for a handful of panels up to a full 9.0kWp system. Natural convection cooling means there's no fan noise and no moving parts to fail.

Viridian Clearline Inverter | 1.0–6.0kW Single Phase
1 or 2 MPPT. Integrated DC isolation. Factory-fitted isolator switch. WiFi-ready.
| Specification | Details |
|---|---|
| Output Range | 1.0kW – 6.0kW |
| Phase | Single Phase |
| MPPT Inputs | 1 MPPT (1.0–3.0kW) / 2 MPPT (3.0–6.0kW) |
| Max Efficiency | 97.6% |
| Cooling | Natural convection (fanless) |
| DC Isolator | Factory-fitted, integrated |
| IP Rating | IP65 |
| Monitoring | WiFi via WE Mate app & Solar Portal (module required) |
| Export Limiting | G98/G99 ready with CT clamp add-on |
| Warranty | 10 years |
Models from 1.0–3.0kW have a single MPPT input, ideal for unshaded rectangular arrays. Models from 3.0–6.0kW feature dual MPPT for split or partially shaded arrays — particularly useful on hipped roofs or where a chimney creates partial shade. Add the WiFi module (£59.00) for app-based monitoring, and the CT clamp (£69.00) for export limiting compliance.
ArcBox: Built-In Fire Safety for In-Roof Solar
DC arc faults in solar connector cables are a serious risk — particularly in in-roof installations where cables run through the roof structure. Viridian's ArcBox is a KIWA fire-tested enclosure that safely contains any arc fault within the box, protecting the surrounding roofing materials.
ArcBox enclosures include built-in ventilation to prevent overheating and internal drainage to stop moisture build-up. They're designed to be installed at every MC4 connector junction and are compatible with a range of mounting brackets to suit different roof configurations.

ArcBox Solar Connector Enclosure | VIR-ARC04-01
KIWA fire-tested DC arc fault containment. For all in-roof MC4 connections.
All Viridian Mounting Equipment We Stock
Quality Heating stocks the complete Viridian Solar mounting and roofing kit range. Below is every mounting component available — from full roofing kits to individual ArcBox brackets for each application.
Roofing Kits & Flashings

F16 Portrait Roofing Kits — TL TC TR TY J
Standard portrait orientation kits. TL/TR = edge kits, TC = centre column, TY = row extender, J = top cap. G1 & M10 panel versions.
VIR-F16-TL / TC / TR / TY / J From £89.00 Shop Kit →
F16 Landscape Roofing Kits — LL LC LR LY LJ
Landscape orientation kits. LL/LR = edge kits, LC = centre column, LY = row extender, LJ = top cap. G1 & M10 panel versions.
VIR-F16-LL / LC / LR / LY / LJ From £99.00 Shop Kit →
VAL16 Landscape Single Panel Roofing Kit
Complete single-panel landscape flashing kit for standalone panel installations. Includes all required flashings. G1 & M10 versions available.
VIR-VAL16-G1 / VIR-VAL16-M10 From £250.00 Shop Kit →
VAT16 Portrait Single Panel Roofing Kit
Complete single-panel portrait flashing kit. Ideal for assessments, single-panel test installations, or unique roof configurations.
VIR-VAT16-G1 / VIR-VAT16-M10 From £210.00 Shop Kit →
F16 Corner Conversion Kits — CLT CRT CRB CLB CLB-S
For L-shaped and stepped solar arrays. CLT = corner top-left, CRT = corner top-right, CRB/CLB = corner bottom variants. CLB-S for slates.
VIR-F16-CLT / CRT / CRB / CLB / CLB-S From £90.00 Shop Kit →
Sarking Bracket Kit — SB16 Range
For slate roofs without tile battens — standard on Scottish sarking construction. Includes variants: SB16-C, J, L, R, Y, CLB-AT. Fixes panels directly to sarking board.
VIR-SB16-C / J / L / R / Y / CLB-AT From £9.00 Shop Kit →ArcBox Mounting Brackets
ArcBox enclosures require a compatible mounting bracket depending on your roof type and racking system. We stock all five bracket types:

ArcBox Rail Mounting Bracket M01
For 8/10mm T-bolt flat roof rail systems. The standard bracket for conventional on-roof rail-mounted arrays.
VIR-ARC-M01-01 £1.95 each Buy Now →
ArcBox Drop Mounting Bracket M02
For pitched roof rail systems with rails up to 40mm. The drop design accommodates raised rail profiles on standard pitched roof installations.
VIR-ARC-M02-01 £4.95 each Buy Now →
ArcBox Mounting Bracket M03 — Esdec FlatFix
Designed specifically for Esdec FlatFix flat roof ballast systems. Clips directly onto the FlatFix rail without additional tools.
VIR-ARC-M03-01 £3.95 each Buy Now →
ArcBox Mounting Bracket M04 — Renusol FS10
For Renusol FS10 flat roof mounting systems. A quick-connect solution for flat roof projects using Renusol racking.
VIR-ARC-M04-01 £4.30 each Buy Now →
ArcBox Batten Mount ARC-BM-25
For direct tile batten mounting on in-roof BIPV installations. Fits 22–25mm tile battens — the standard batten size used with Clearline Fusion in-roof systems.
VIR-ARC-BM-25-01 £1.97 each Buy Now →Industry Certifications & Accreditations
Clearline Fusion is the most certified in-roof solar system available in the UK. These accreditations give specifiers, builders, and homeowners confidence in long-term performance and building compliance.
BBA Agrément Certificate
Independent third-party accreditation for the complete system — the only in-roof solar system with BBA certification.
NHBC 2024
Meets new NHBC Technical Requirements for durability, issued 2024. Simplifies compliance for housebuilders.
LABC Warranty
Satisfies requirements of Local Authority Building Control Warranty — accepted alongside NHBC across the UK.
Part L Compliant
Meets current Building Regulations Part L (conservation of fuel and power), supporting Future Homes Standard targets.
KIWA Fire Tested
ArcBox enclosures independently fire tested by KIWA for arc fault containment within the roof structure.
Wind Load Certified
Certified wind resistance exceeds competitor products by more than double — critical for exposed and coastal UK locations.
Fusion Forest
Viridian plants a tree for every 5 panels sold. A built-in sustainability contribution with every installation.
UK Manufactured
Panels and systems engineered and manufactured near Cambridge, UK — designed specifically for UK weather conditions.
What You Need for a Complete Installation
Use this checklist when planning a Clearline Fusion installation to make sure you have everything before getting on the roof:
- PV16 panels in required wattage (335W, 405W, or 445W)
- F16 Portrait or Landscape edge kits (L + R minimum per array)
- F16 Centre column kits (C) — one per internal column
- F16 Row extension kits (Y) — one per additional row above the first
- F16 Top cap kits (J) — for the topmost row if needed
- Corner Conversion Kits if array is non-rectangular (hipped roof)
- Sarking Bracket Kits (SB16) if installing on Scottish sarking construction
- ArcBox enclosures — one per connector pair
- ArcBox Batten Mount (BM-25) for in-roof tile batten fixing
- Clearline Inverter — sized to total panel wattage
- WiFi Module (VIR-CSI-WIFI) for app monitoring
- CT Clamp (VIR-CSI-CT) for export limiting / G98 G99 compliance
- DC and AC cabling, MC4 connectors, isolators
- Roofing membrane (underfelt) confirmed continuous and draining to gutter
Ready to Specify Viridian Clearline Fusion?
Browse our complete range of Viridian Solar panels, inverters, and mounting kits — or get in touch with our team for help specifying a project.
Shop Viridian Solar Range →